
What is the wait element in Salesforce Flow?
- D.Khare
- Jun 26, 2024
- 6 min read
Updated: Jul 9, 2024

#SalesforceWinter24 Advanced Pause has been renamed to Wait for Conditions so that all wait elements have similar terminology. The functionality of the element is unchanged. However, in the Winter '24 release, Salesforce introduced three new Wait elements to replace the Pause element. With the Winter 24 release, the ‘Wait for Amount of Time’ element and the ‘Wait Until Date’ elements are now available in Schedule-triggered flows, Auto-launched flows, and Orchestrations. Previously, these wait elements were available only for journeys.


It is important to note that a Wait element can only be used in Autolaunched Flows (a Flow with NO screens or dynamic choice elements). To me, a wait element is simply a time-dependent workflow action snapped into a flow. You can set up different event criteria and send the record to different elements based on the requirements. This works very similarly to how the Decision element works.
Wait elements are your Time-Dependent Workflow Actions in a Flow. They function in almost the same way. You can now reduce having a Flow trigger a workflow with a Time-Dependent Workflow Action and add it directly into your Flow!

Let's explore what these elements are and how to use them.
Wait for Conditions
The 'Wait for Conditions' element replaces the Pause element, and there is almost no difference between them. You can use this element to wait until a specific time or until a platform event message. Like the old Pause element, you can set the resume time by putting a base time, offset number, and unit. Moreover, you can set the wait conditions and you can add multiple wait configurations by clicking the plus button.

Wait for Amount of Time
The 'Wait for Amount of Time' element enables you to wait for a specified duration, with valid values being Minutes, Hours, Days, and Months. Furthermore, you can resume at a specific time of day.

While it may appear as a completely new feature, accomplishing this was also possible using the old Pause element. For instance, you could create a date/time formula that returns three months from the current date and use it as the resume time of the Pause element. However, the new Wait for Amount of Time element makes the configuration much easier.
Wait Until Date
Wait Until Date element lets you wait until a specific date and time.

You only need to set the resume date/time and choose the time zone. Once again, achieving this was also possible using the old Pause element. For instance, you could create a date/time formula that returns the specific date you desire and use it as the resume time for the Pause element. However, the new Wait Until Date element simplifies the configuration significantly.
Why use Wait Element?
Sleep/pause/wait is not available for apex, i.e. you cannot pause a thread for some time.
With the auto-launched Flow, you can develop a solution that uses the wait elements to simulate sleep behavior.
In computer science, polling or a polled operation denotes the process of repeatedly sampling the status of external devices by a client program. Using these we can develop a polling solution in Salesforce.
Wait Elements Flow Considerations
While having the ability to Pause your flows is powerful, it also comes with some important considerations that you should keep in mind when designing and building your flows with wait elements.
Firstly, as mentioned above, there are only certain flow types that support the ability to use Pauses. Autolaunched flows and scheduled flows are the only flows that support wait elements, and if an unsupported flow type calls a subflow (autolaunched flow) it must not contain a wait element. The error will be displayed when you try to call a subflow with a wait element from a record-triggered flow (remember, record-triggered flows don’t support Pauses).
Let’s have a look at an example using all 3 wait elements.
Business Requirement: I want to streamline the onboarding process for new customers. The onboarding process includes sending a welcome email immediately, scheduling a follow-up call three days later, checking if the customer has completed the initial setup within a week, and sending a survey two weeks after the onboarding process starts.
Solution: I will be using a Scheduled Triggered Flow to setup an onboarding process
Flow Overview
Flow begins for all contact records created on that day
Decision to compare Created Date
Send Immediate Welcome Email
Wait for Amount of Time (2 Days Later)
Schedule Follow-Up Call
Wait for Amount of Time (5 Days Later)
Send Reminder Email
Wait Until Condition (Onboarding Completion)
Condition Met (Setup Complete)
Condition Not Met (Setup Incomplete)
Wait for Amount of Time (7 Days Later)
Send Survey Email
Wait Until Date (Project Start Date)
Send Project Email
Step 1: Define Flow
Click Setup.
In the Quick Find box, type Flows.
Select Flows then click on the New Flow.
Select the Scheduled Triggered Flow option.
Click Done
Step 2: Add the Decision element
This element checks whether the record was created today or not.
Compare 'Created Date' with 'Current today's date'

Step 3: Send Immediate Welcome Email
I created an Email Alert and Email template to be used in the Send Email Alert element.

Send a welcome email to the customer immediately after they sign up. I have chosen the Email field of the Contact object.

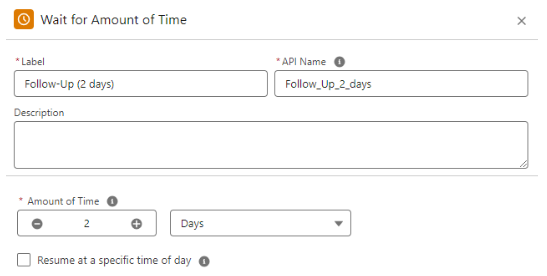
Step 4: Wait for Amount of Time (2 Days Later)
The flow pauses until 2 days after the customer signs up.
Step 5: Schedule Follow-Up Call
Schedule a follow-up call with the customer to check in and answer any questions. I have used the Create Records element to create a task record with a Call Subject.


Step 6: Wait for Amount of Time (5 Days Later)
The flow pauses until 5 days after the customer signs up. It is basically the total waiting period.
Calculate 3 days after the follow up call.

Step 7: Send Reminder Email
Send a reminder email to the customer to complete the setup.
I created an Email Alert and Email template to be used in the Send Email Alert element.
Step 8: Wait Until Condition (Onboarding Completion)
Use the 'Wait Until Condition' element to check the status of Onboarding till its complete.


Step 8.1: Condition Met (Setup Complete)
Check if the customer has completed the initial setup.
I am reverting it to the next element by executing it as Default outcome

Step 8.2: Condition Not Met (Setup Incomplete)
Step 8.2.1:Wait for Amount of Time (7 Days Later)
The flow pauses until 7 days after the customer signs up. It is the total waiting period.
Calculate 2 days after the follow-up call.

Step 8.2.2:Send Survey Email
Send a survey email to gather feedback about the onboarding experience.
I created an Email Alert and Email template to be used in the Send Email Alert element.
Step 9: Wait Until Date (Project Start Date)
The flow waits until a specific time of day to send the product email. I am just assuming in this condition it is waiting till 8 July 2024 10 AM.

Step 10: Send Product Email
Send a product email to gather feedback about the onboarding experience.
I created an Email Alert and Email template to be used in the Send Email Alert element.
Almost there! Once everything looks good, click the Save and Activate button.
Test your implementation
Make a record on the Asset object with the serial number field left blank. Then, when you refresh the page after the time you've specified, the description field will be updated.
Monitor Your Schedule Flow
To monitor Flows that are scheduled, navigate to the following path:
Navigate to Setup (Gear Icon) | Environments | Monitoring | Time-Based Workflow.
Click Search.
Now look for your Scheduled Flow job by adding a condition
Use the Delete button to delete the time-based Flow job from the queue.
This can also be seen under Setup (Gear Icon) | Schedule Jobs.
Deployment
Note: Due to this error: 'Flows of type "AutoLaunchedFlow" have to specify WaitDuration elements with the offset attribute set.'
The attribute is reserved for the future. So it can't be deployed.

The reference is from this document: Wait Element Metadata
Conclusion
There you have it! This article examined why you might need to use a Wait element in a Salesforce Flow. We also went through step-by-step instructions for adding a wait element to your flow and confirming each part of the wait element is populated correctly. We also discussed some key considerations you must remember when designing and building Pauses into your flows. Overall, using a wait element can help ensure your flow runs smoothly and efficiently by allowing for necessary delays in a structured manner.
Please stay tuned to our blogs! I will give you an update regarding the deployment soon.
Blog Credit:
D. Khare
Salesforce Developer
Avenoir Technologies Pvt. Ltd.
Reach us: team@avenoir.ai
Reference
https://www.avenoir.ai/post/flow-errors-common-issues-and-examples
https://www.avenoir.ai/post/tips-and-tricks-for-handling-errors-in-salesforce-flows
https://help.salesforce.com/s/articleView?id=sf.flow_ref_elements_pause.htm&type=5
https://help.salesforce.com/s/articleView?id=sf.flow_ref_elements_wait_for_conditions.htm&type=5
https://help.salesforce.com/s/articleView?id=sf.flow_ref_elements_wait_examples.htm&type=5
https://help.salesforce.com/s/articleView?id=sf.flow_ref_elements_wait_for_amount_of_time.htm&type=5
https://help.salesforce.com/s/articleView?id=sf.flow_ref_elements_wait_until_date.htm&type=5
Comments