UPDATE RECORD WHEN A LEAD IS ACCEPTED VIA OMNICHANNEL
- P. Ahuja
- May 12, 2023
- 3 min read
Updated: Oct 17, 2023

Using Record-Triggered flow in Salesforce, when a customer initiates a chat, email, or other interaction with a company, it is essential to have a way to handle these requests efficiently. This is where Omni-Channel comes in.
Omni-Channel is a powerful Salesforce feature that allows you to route work items, such as chat messages or emails, to available agents. When an agent accepts a work item, an Agent Work record is created in Salesforce. In this blog, I will show you how to use record-triggered flows to automatically update a Lead record when a lead is accepted via the Omni channel. Although, via the functionality I will be showing, you can trigger any action on any object once it gets accepted via omnichannel.

Prerequisites:
Before we begin, make sure you have the following:
Access to the Salesforce Lightning Experience
Permission to create and edit flows
Permission to create and edit Lead and Agent Work records
Omnichannel configuration
Step 1: Create the Flow
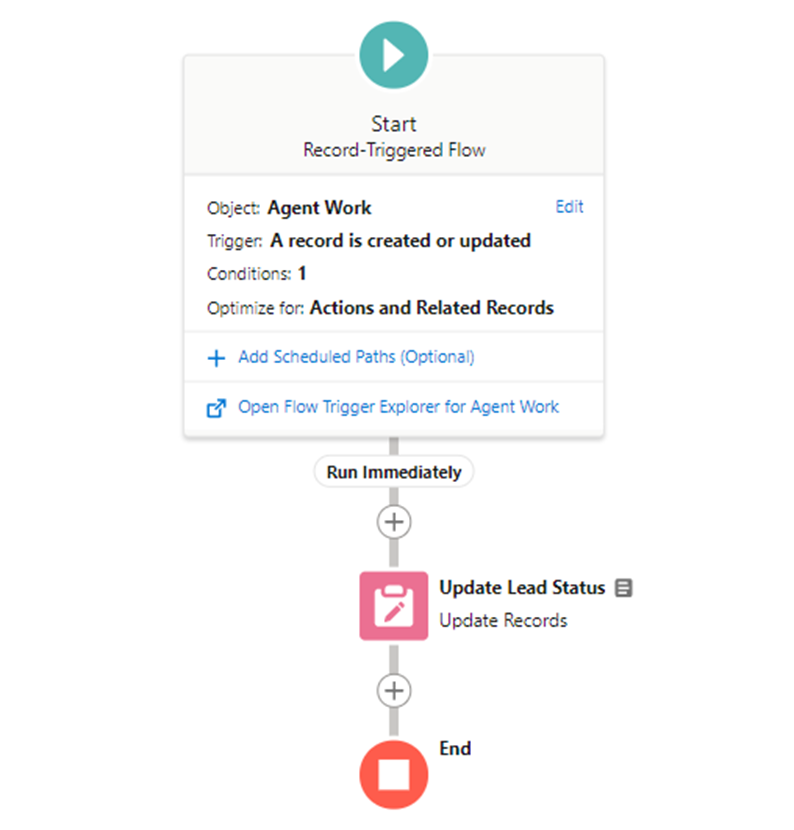
The first step is to create a record-triggered flow on the Agent Work object that will update the Lead record when a lead is accepted via the Omni channel. Follow these steps:
Go to Setup and search for "Flows" in the Quick Find box.
Click on "Flows" and then click on "New Flow".
Choose "Record-Triggered Flow" and select the Agent Work object.
Object: Agent Work
Trigger: A record is created or updated
Entry Conditions: AcceptDateTime is not null
Optimization: Actions and Related Records (flow runs after the record is saved to the database)
4. Give the flow a name “Lead Update Status” and click "Create".
By selecting the Agent Work object and the "A record is created or updated" trigger, we ensure that the flow is triggered whenever a new Agent Work record is created or updated. The entry condition "AcceptDateTime is not null" limits the flow to only triggering when the Agent Work record has been accepted by an agent. Finally, by selecting "Actions and Related Records" as the optimization option, we can update any record and perform actions after the record is saved to the database.


Now we need to add the "Update Records" flow element to update the status field of the corresponding Lead record. We configure it as follows:
5. Drag the "Update Records" flow element onto the canvas.
6. Configure the flow element as follows:
Object: Lead
Filter: Id = Agent Work Record ID ($Record > WorkItem ID)
Condition Requirement: All conditions are met (AND)
Field: Status
Operator: Equals
Value: "Working - Contacted"


By selecting the Lead object and filtering it based on the Agent Work record ID, we can find the corresponding Lead record that needs to be updated. In this case, we are updating the status field to "Working - Contacted", but we could update any other field as needed.
7. Save the flow.
Step 2: Activate the Flow
Once you have created the flow, you need to activate it. Follow these steps:
Click on the "Activate" button in the upper right-hand corner of the flow.
Choose the version of the flow you want to activate.
Click "Activate".
Step 3: Test the Flow
To test the flow, follow these steps:
Create a new Lead record.

Update the lead owner of the newly created lead record with a queue created for omnichannel routing configuration to route it to the agent.

When the agent accepts the work item, the Lead record's status should be updated to "Working - Contacted".


Conclusion
In this blog, I showed you how to use record-triggered flows to automatically update a related Lead record when a lead is accepted via the Omni channel in Salesforce. By following these steps, you can save time and improve efficiency in handling customer interactions.
If you'd like to see the code and resources used in this project, you can access the repository on GitHub.To access the AVENOIRBLOGS repository, click here. Feel free to explore the code and use it as a reference for your own projects.
Happy!! to help you add to your knowledge. You can leave a comment to help me understand how the blog helped you. If you need further assistance, please contact us. You can click "Reach Us" on the website and share the issue with me.
Reference
Blog Credit:
P. Ahuja
Salesforce Developer
Avenoir Technologies Pvt. Ltd.
Reach us: team@avenoir.ai
Are you in need of Salesforce Developers?


Comments